From time to time, electronic lists of contact information may find their way into your hands. Business Administrator can import such lists automatically and all by itself.
Location: Contact Manager, Contact Utilities
Overview
There are essentially two ways that you might acquire a contact list. First, you might buy one: there is information on the Business Administrator website that offers contacts on where to buy contacts lists. Secondly, you might create them yourself.
If the list is in the correct format (see Formatting Excel documents in preparation for Contact List import, below), Business Administrator will guide you on how to import the information. Once it is set up, Business Administrator can enter several hundred names a minute, depending on computer capabilities.
Four stages to importing a list of names
First, ensure the data in the list is right for Business Administrator. Basically, it needs to be reasonably ordered – read about this in ‘Formatting Excel Documents in Preparation for Contact List Import’, below.
Second, enter details about the list, including its location, the source of the information and add the expiry date (when you buy marketing lists you are usually allowed to use them for only one year). Click on Start Importing. Business Administrator will bring them into ‘the warehouse’.
Third, you need to tell Business Administrator what the information is (see ‘Delimiting the Names’, below).
Fourth, check that the information is accurate. This is your last chance to check that Business Administrator understands the data you provided. If it is not, click on Cancel and Close, correct the data and restart the process. If it is OK, then click on Update and Show Next Item and check those details. If it's still OK, check the next couple of contacts as well. Remember, if this goes wrong, there is no way to undo it, save editing it from the contact entry system.
Fifth, if everything is still all right, click on AutoPilot. Business Administrator will roll through all the contacts checking and adding them to the system. With AutoPilot on, Business Administrator will not stop for any reason other than duplication. And if it does, it is your only opportunity to switch AutoPilot off.
Formatting documents in preparation for Contact List import
The data for an electronic contact list must be arranged so that the headers are spread across columns (though it is not necessary to include the headers themselves): the data itself must progress downwards. If you are using comma-delimited data, then arrange the headers on the first line, each separated by commas. Add each contact on a line-by-line basis going downwards and ensure that data is placed accurately under the headers in terms of comma numbers.
The headers (though you don't need to include them) ought to follow a particular order: Name (or Title, Forename, Initials and Surname), Job Title, Department, Company Name, Address 1, Address 2, Address 3, Town, County, Post Code, Country, Phone, Fax then e-Mail Address. If the names are joined together (e.g., Mr Joe Bloggs), there is no need to split them: Business Administrator can do this under a function called Split Name (see Delimiting the Names below). If the address is of a non-UK format then use the proper order of that format: Business Administrator understands international address formats. By ordering the columns sensibly, you will make your own life easier.
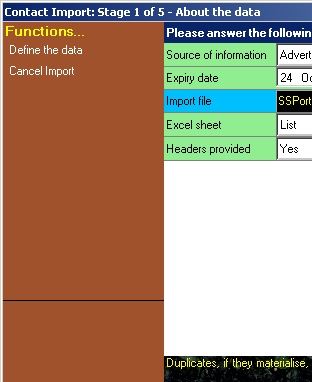
Entering information about the contact list
Source of information: Business Administrator always requires the source of the information when importing an electronic contact list. There may be legal implications and you might want to refer back to it at a later date.
Expiry date: When does this list expire? Many lists are bought by contract and allow use for a certain period, usually a year. If any of the contacts are converted to customers, suppliers or personnel, then the expiry information will be removed and the contact permanently kept. Otherwise the contact information will automatically be deleted after the contract period.
Import file: Select the file that is the electronic contact list.
Excel sheet: If the electronic contact list is an Excel file, and that file has several sheets in it, Business Administrator will ask which sheet holds the information you wish to import.
Headers provided: You should state whether or not you have included headers in your file,
IMPORTANT: You will not be wise to mix jurisdictions in one file.
When done, click Define the Data in the Function Bar.
Defining the Data
This is an important issue when importing lists of names and is similar to parsing information, as described by other software. When you have brought a list of names into 'the warehouse', you need to tell Business Administrator what the information means. It is unlikely that you'll find a contact that uses all fields, so the fields are made up of disconnected information. Don't worry about this. Choose from the drop-down lists to tell Business Administrator what the data in the fields are.
Split Name might need further explanation. Frequently you will be given the contact's name with the Title, First Name and Surname joined together in a single field, such as Mr Joe FJ Bloggs. Split Name will literally do that: split the name up into its components, Mr (as the title), Joe (as the first name), FJ (as the initials) and Bloggs (as the surname).
If there is a field you don't want, choose Dismiss Item. Double check everything is correct before moving on. When you're sure that it is, click on Update and Close.
When you have finished defining the data, click Assign Project from the Function Bar.
Assign Project
You will be wise to load the contacts into a group when you import them: it will make it easier to manage them. The sensible group to put them into is a project. In fact, Business Administrator requires that you enter them into a project.
You can create a new project, if you wish, by clicking New Project on the Function Bar. Alternatively, select one of more projects from the list provided. You can hold down Control or Shift to select multiple projects: holding Shift down will select a continuous range of projects.
When done, select Start Importing from the Function Bar.
Importing the Contacts
When you click Start Importing, Business Administrator will present its interpretation of how the information lies.
Note that this is your last chance to get the information right. If it’s not, click Cancel Import and start again.
If it is correct, then click Update and Show Next Item, whence Business Administrator will save the information, and show the next item. Check the next few to ensure they are correct.
If they are correct, you could click Use AutoPilot. This is an instruction to Business Administrator to get on with it, and import all the remaining contacts. Business Administrator will tell you when it is finished.
It will also give an estimated time of completion for long jobs.
Duplicate data
Business Administrator is constantly on the look out for duplicate data. Duplicate data can pervert reporting, so it’s vital that data is clean. Largely, Business Administrator can recognise duplicate data, and will update existing information with the new latest information.
If it can’t handle the data, it will say so, and display the information at the bottom of the dialogue box. It will expect you to tell it how the duplicate data should be resolved. If Business Administrator is in AutoPilot, it will of course stop to do this. You can restart AutoPilot afterwards.